Гарын авлага V1.2
Smart mido
User guide v1.2
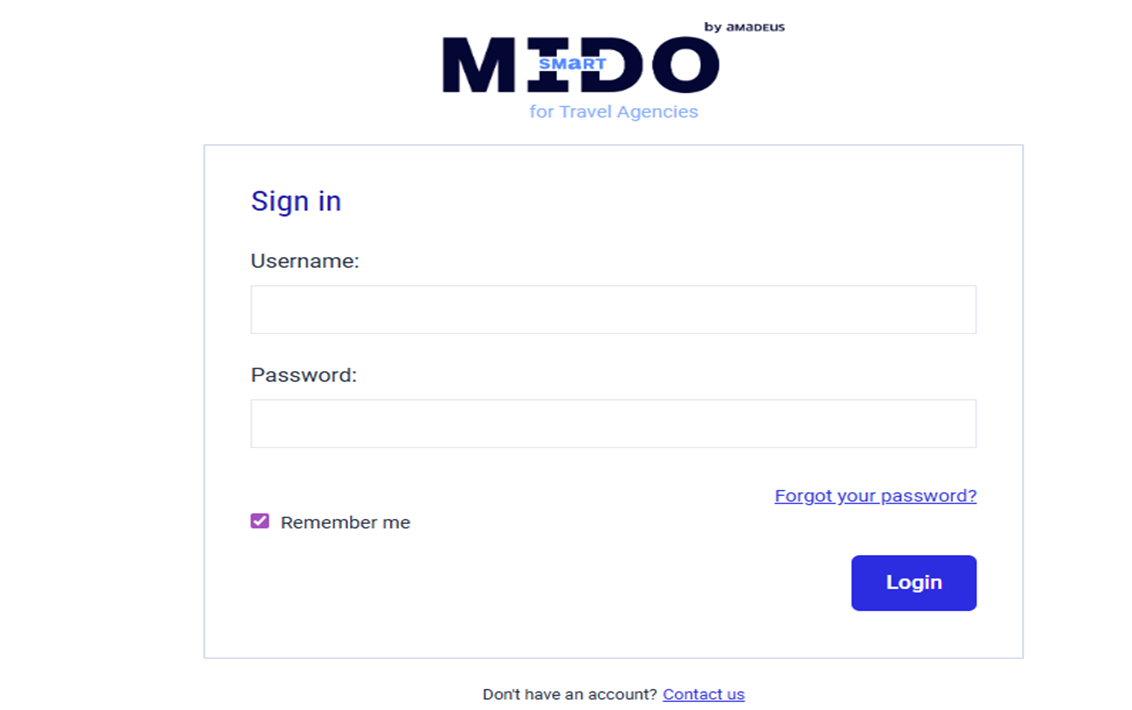
НЭВТРЭХ ХЭСЭГ
- Вэб хөтөч (Chrome, Edge гэх мэт)-д https://smartmido.mn эсвэл байгууллагаас өгсөн хаягийг оруулна. https://smartmido.mn or the URL provided by your organization.
- “Login” дэлгэц гарч ирнэ.
- “Username” хэсэгт өөрийн хэрэглэгчийн нэрийг бичнэ.
- “Password” хэсэгт өөрийн нууц үгийг оруулна.
- “Remember me” дээр чагт тавивал таны нэр/нууц үг хадгалагдана.
- [Login] товчийг дарж системд нэвтэрнэ.
Хэрвээ нууц үгээ мартсан бол "Forgot your password?" дээр дарж шинэчлэх заавар авна.
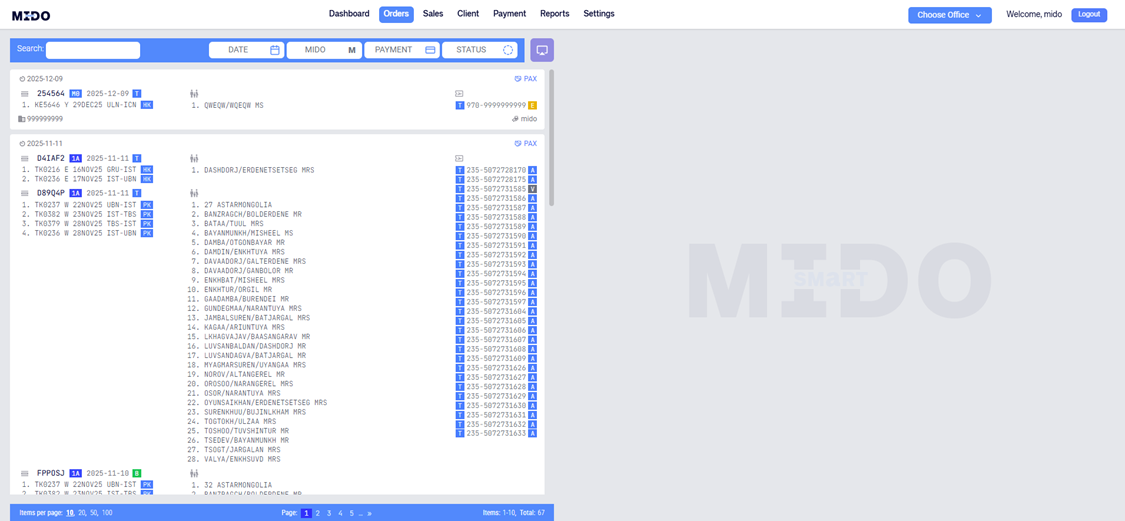
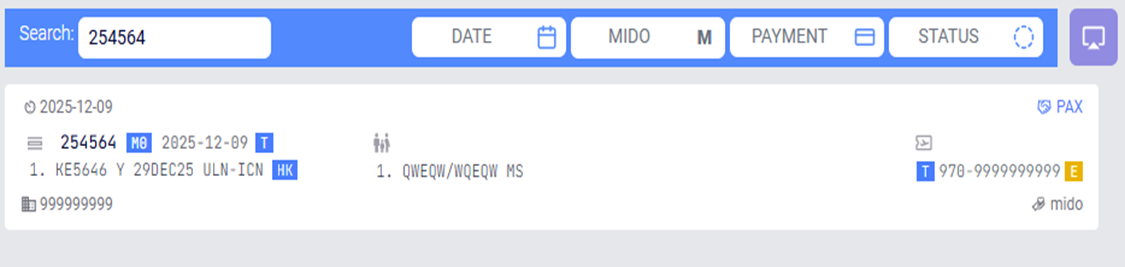
ЗАХИАЛГЫН ҮНДСЭН ДЭЛГЭЦ
Энэ хэсэг бол таны захиалгуудын төв дэлгэц юм. Энд таны бүртгэгдсэн нислэг, зорчигчдын мэдээлэл харагдана.
ЮУ ХИЙЖ БОЛОХ ВЭ?
- Хайлт хийх
- Захиалгын огноогоор шүүх
- Агент буюу ажилтнаар шүүх
- Төлөвөөр (active, refund гэх мэт) ангилах
- • Төлбөрийн статус шалгах
Гараар захиалга оруулах.
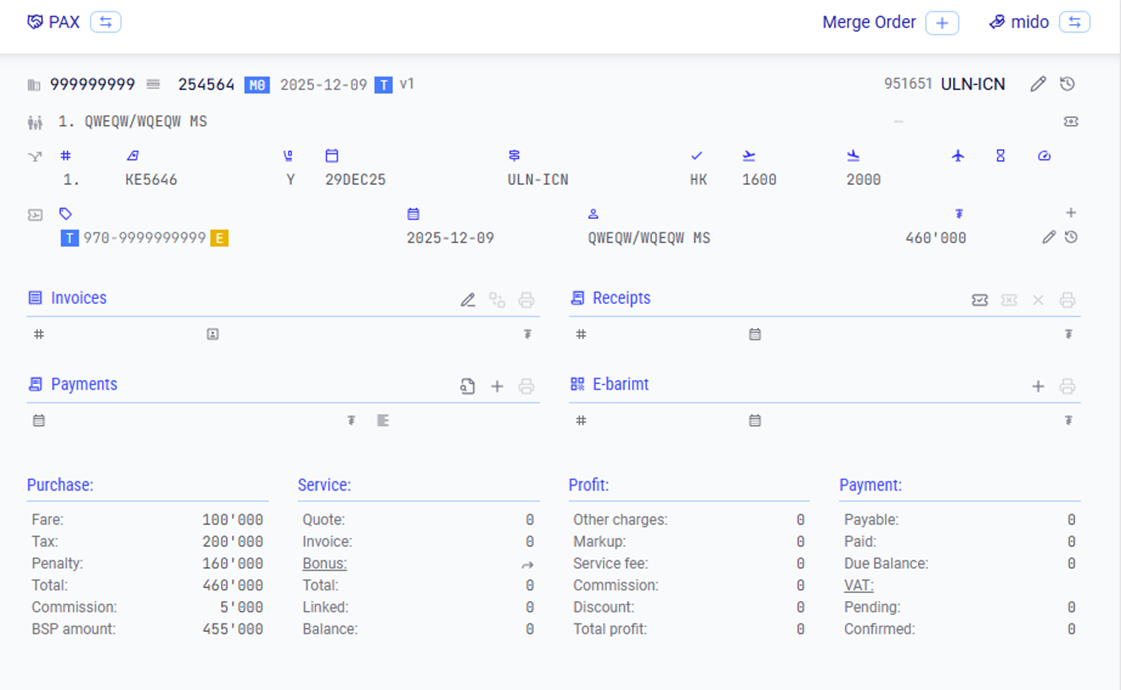
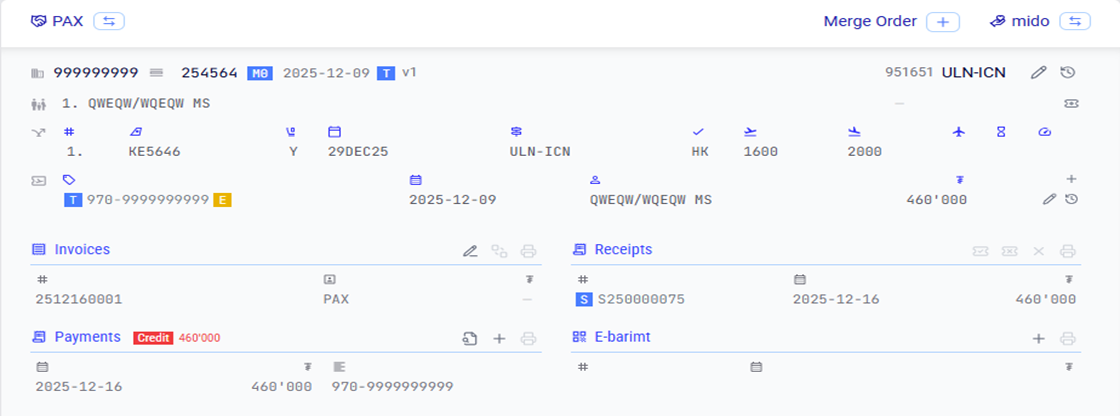
ЗАХИАЛГЫН ҮНДСЭН ДЭЛГЭЦ - ДЭЛГЭРЭНГҮЙ
Та аль 1 захиалга дээр дарснаар уг нислэгийн дэлгэрэнгүй мэдээлэл гарч ирнэ.
Үүнд :
- Зорчигчийн нэр
- Нислэгийн дугаар
- Нислэгийн чиглэл, нисэх цаг
- Тасалбарын үнэ
- Комисс, ашиг, шимтгэл
Дэлгэрэнгүй цонхнууд:
- Invoice
- Receipt
- Payment
- E-barimt
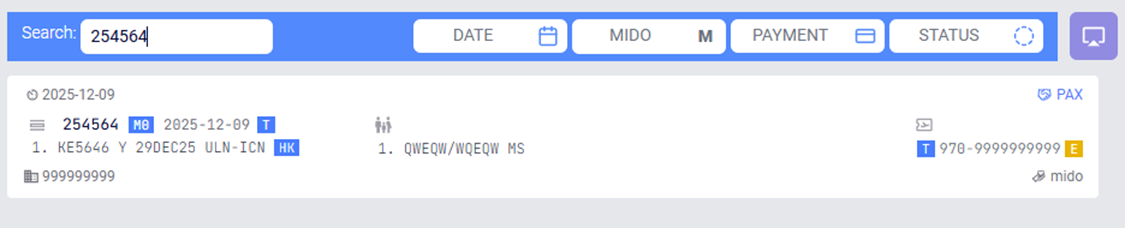
ХАЙЛТ ХИЙХ
- Та Search хэсэгт өөрийн хайлт хийх утгыг хийж хайлт хийх боломжтой юм. / Зорчигчийн нэр, PNR дугаар, Нислэг чиглэл, Эйрлайн, Огноо, Төлөх дүн гэх мэт бүх талбараас хайлт хийх боломжтой юм.
- The system allows searching across all fields, including passenger
name, PNR number, flight route, airline, date, payable amount, and more.
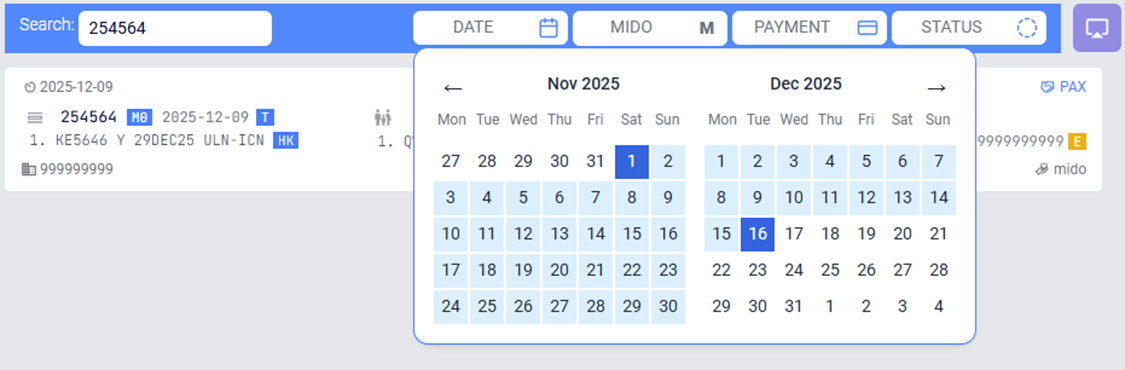
Захиалгуудын жагсаалтын дээр байгаа "Date" талбараас эхлэх болон дуусах огноо сонгоно. Ингэснээр зөвхөн таны огноонд хамаарах захиалгууд дэлгэцэнд харагдана.
Once selected, only the bookings that fall within the chosen date range will be displayed on the screen.
Agent – Хэсэгт та хамтран бусад хүмүүс нэрсийг жагсаалтаас сонгож харах боломжтой бөгөөд таны сонгсон агентын зөвхөн нислэгийн мэдээлэл танд харагдах бөгөөд үүсгэсэн нэхэмжлэх болон төлбөр төлөлт зэрэг санхүүгийн мэдээлэл харагдахгүй юм.
Payment – Хэсэгт та өөрийн захиалгуудыг Төлөвөөр ангилан харах боломжтой бөгөөд
All payment – Бүх захиалга
None – Receipt үүсгээгүй буюу ямар 1 төлбөр үүсгээгүй захиалга
Credit – Төлбөрийн үлдэгдэлтэй захиалгууд
Paid – Төлбөр бүрэн төлөгдсөн захиалга
Overpaid – Илүү төлөлттэй буюу тийзний дүнгээс илүү төлбөр төлсөн
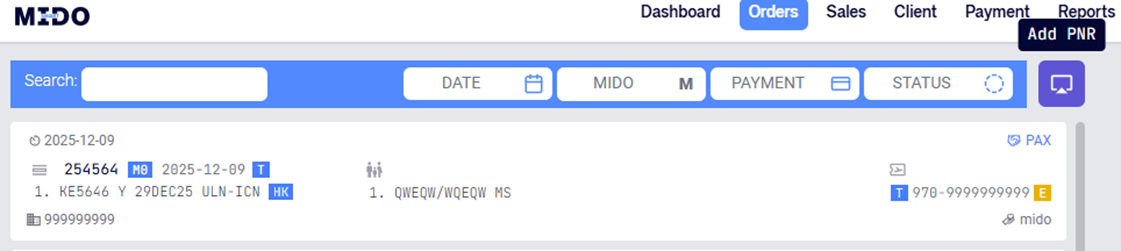
ШИНЭ ЗАХИАЛГА ҮҮСГЭХ – MANUAL CREATE
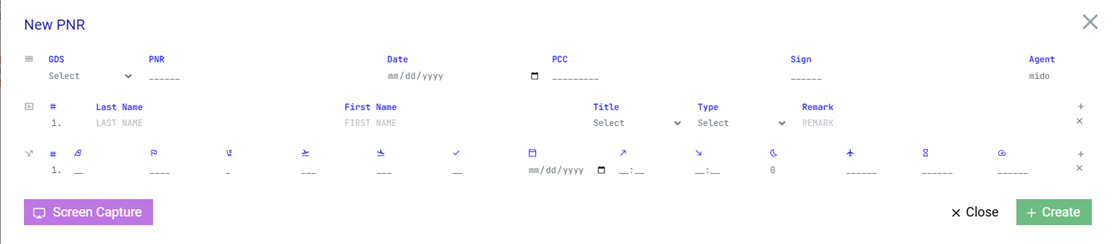
Та Add PNR товчийг дарж шинээр захиалга гараар оруулж өгч болох юм. Энэхүү хэсгийг зарим онлайн захиалга болон бусад Cryptic бус захиалгын системийн захиалга бүртгэхдээ хэрэглэх юм.
This section is used to register certain online bookings as well as bookings from other non-cryptic reservation systems.
Та Add PNR товч дарснаар дараах цонх гарч ирэх бөгөөд Та энэ цонхонд GDS талбараас захиалга бүртгэх GDS-г сонгож өгч захиалга оруулах юм.
In this window, select the appropriate GDS from the GDS field to register the booking and proceed with entering the booking details.
GDS
- 1A – Amadeus
- 1S – Sabre
- 1G – Galileo
- AT – Altea
- M0 – Aero Mongolia
- OT – Other (other online bookings)
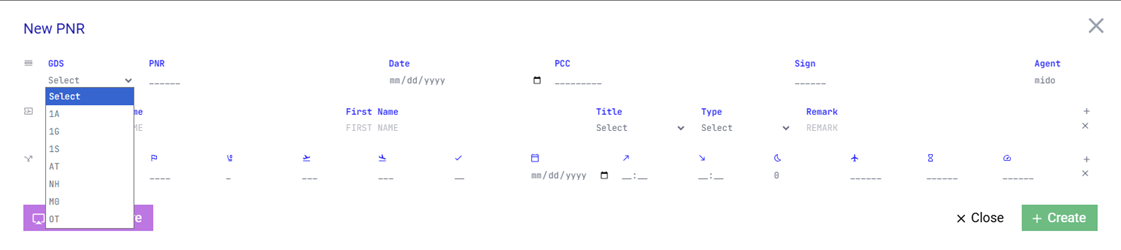
GDS талбараас харгалзах GDS-г сонгосны дараагаар харгалзах талбаруудад Нислэг болон Зорчигчийн мэдээллийг оруулж “CREATE” товчийг дарж захиалгыг үүсгэнэ.
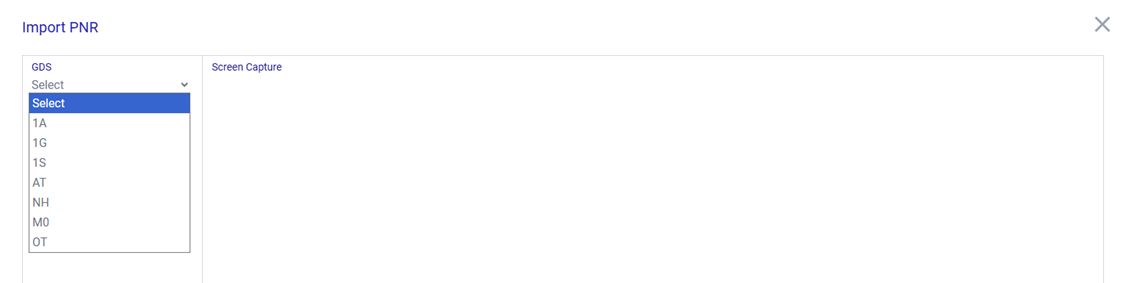
ШИНЭ ЗАХИАЛГА ҮҮСГЭХ – PARSING
Та тухайн захиалгыг гараар үүсгэхээс гадна. Тухайн захиалга хийгдсэн систэмээс Cryptic ticket image-г хуулан авч Add PNR цонхны Зүүн доор байрлах Screen capture дарж оруулах боломжтой юм. Ингэснээр Smartmido Систем тухайн мэдээллийг автоматаар таньж системд бүртгэх боломжтой юм.
Once uploaded, the SmartMido system will automatically recognize the information and register it in the system.
GDS
- 1A – Amadeus
- 1S – Sabre
- 1G – Galileo
- AT – Altea
- M0 – Aero Mongolia
- OT – Other (other online bookings)
ГАРААР ҮҮСГЭСЭН ЗАХИАЛГЫН ТИЙЗ ҮҮСГЭХ
When you click on a manually registered booking, a detailed window will appear.
Та гараар бүртгэсэн захиалга дээр дархад дэлгэрэнгүй цонх гарч ирэх бөгөөд. Та энэхүү цонхны Баруун хэсэгт байрлах “Issue Document” Товчийг дарж тухайн зорчигчийн тийзийн мэдээллийг бүрэн оруулан тийз үүсгэнэ.
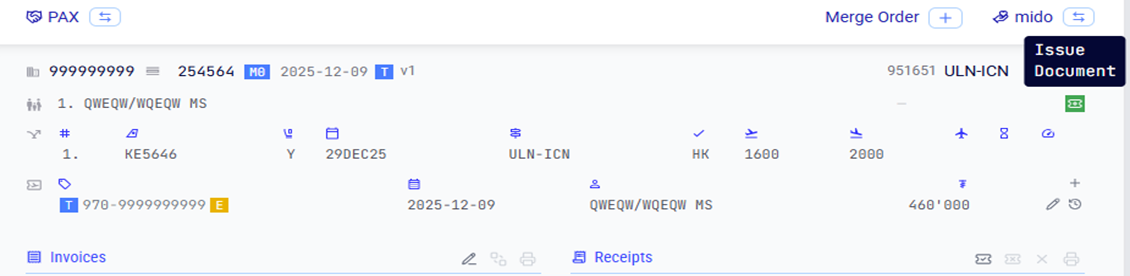
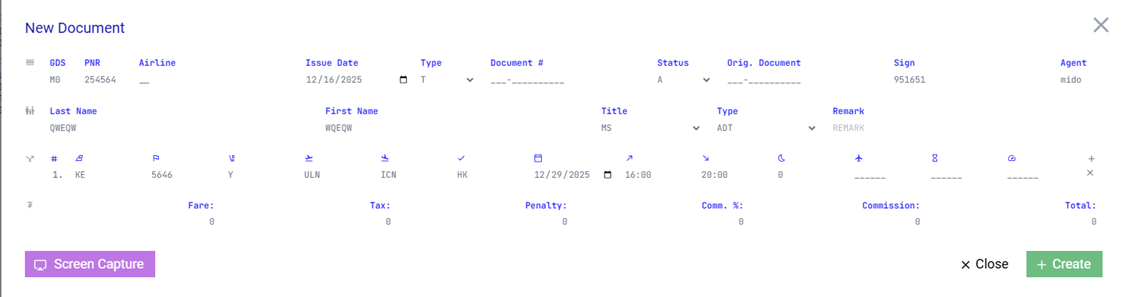
Issue Document товч дархад дараах цонх дэлгэцэнд харагдах бөгөөд та энэхүү талбар тухайн зорчигчийн тасалбарын
In this window, you can enter the passenger’s ticket details.Airline code
Type – Select Active, Refund, or Exchange
Document – Тасалбарын дугаар
Fare – Тийз үнэ
TAX – Тийз такс
Penalty – Торгууль
Comm % – Комисс хувь
Эсвэл
Commission – Комисс мөнгөн дүнгээр
Зэрэг мэдээллүүдийг бүрэн оруулж тухайн зорчигчийн тасалбарын мэдээллийг үүсгэнэ.
НЭХЭМЖЛЭЛ ҮҮСГЭХ
Та үндсэн захиалгын дэлгэцэн дээр дарж “Create invoice” товчийг дарж нэхэмжлэх үүсгэх боломжтой.
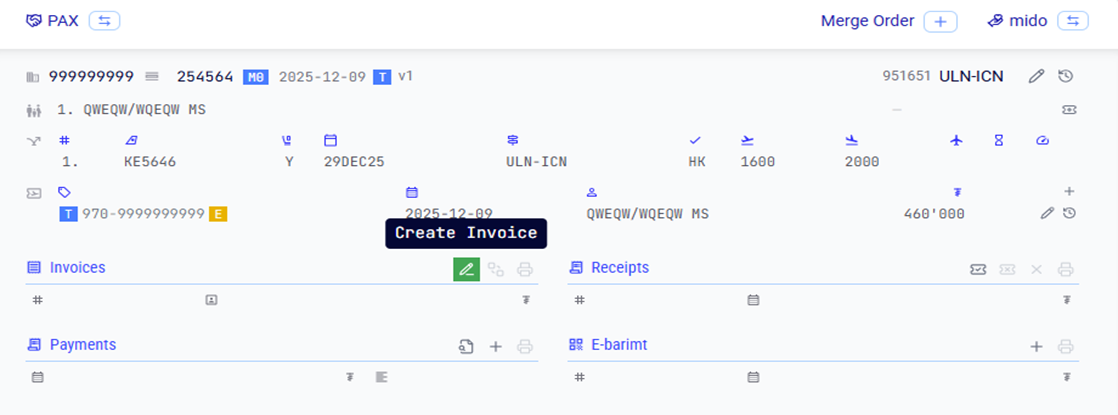
Create invoice цонх :
Та энэхүү гарч ирсэн цонхонд тухайн зорчигчоос нэхэмжлэх мэдээллүүдийг оруулж өгч нэхэмжлэх үүсгэнэ.
Fields:
- Date – Нэхэмжлэл үүсгэн огноо.
- Type – Нэхэмжлэлийн төрөл Invoice – Нэхэмжлэх , Quote – Үнийн санал
- Due Date, Due Time – Нэхэмжлэлийн хүчин төгөлдөр хугацаа
- Branch – Таны салбар
- Customer name – Нэхэмжлэх хүн болон байгууллага нэр
- Customer Reg # – Нэхэмжлэх хүн байгууллага Регистер дугаар
- E-Mail – Харилцагчийн и-мэйл хаяг
- Phone – Харилцагчийн утас
- Currency – Нэхэмжлэл үүсгэх мөнгөн тэмдэгт
Доод хэсэг :
- Note – Нэхэмжлэл дээр харуулах нэмэлт мэдээлэл
- Bank Accounts – Энэ хэсэгт байгуулгын үүсгэсэн данснуудаас сонгон ашиглах
- Date Change fee, Refund fee, No show fee – Харгалзах торгуулийн мэдээлэл оруулах
- Add PNR – Зүүн доор байрлах энэхүү товчийг дарж та 1 байгуулгын 2 болон түүнээс дээш захиалгыг нэгтгэн нэхэмжлэх боломжтой.
- Duplicate price – Олон зорчигчтой тохиолдолд энэ товчийг ашиглаж болох бөгөөд хамгийн эхний зорчигчийн үнийн мэдээллийг бүх зорчигчийн үнийн мэдээлэлтэй ижил болгоно.
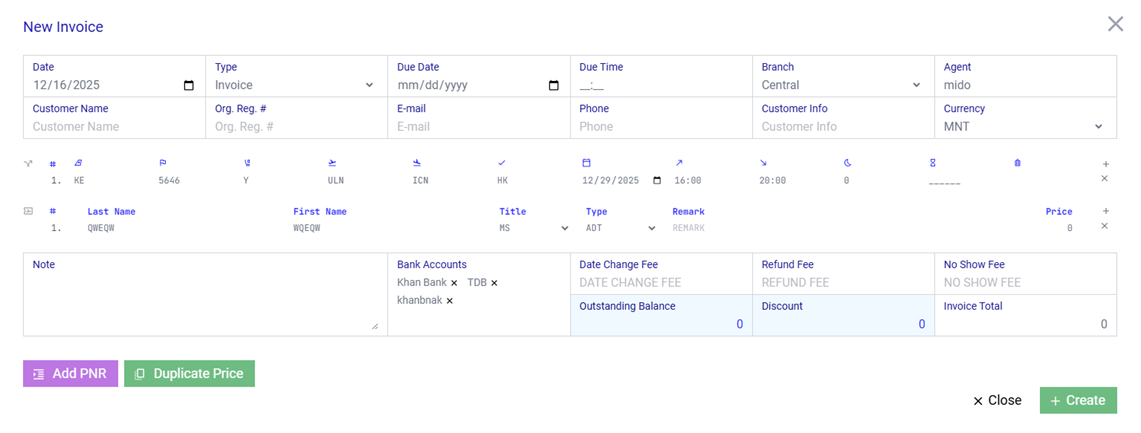
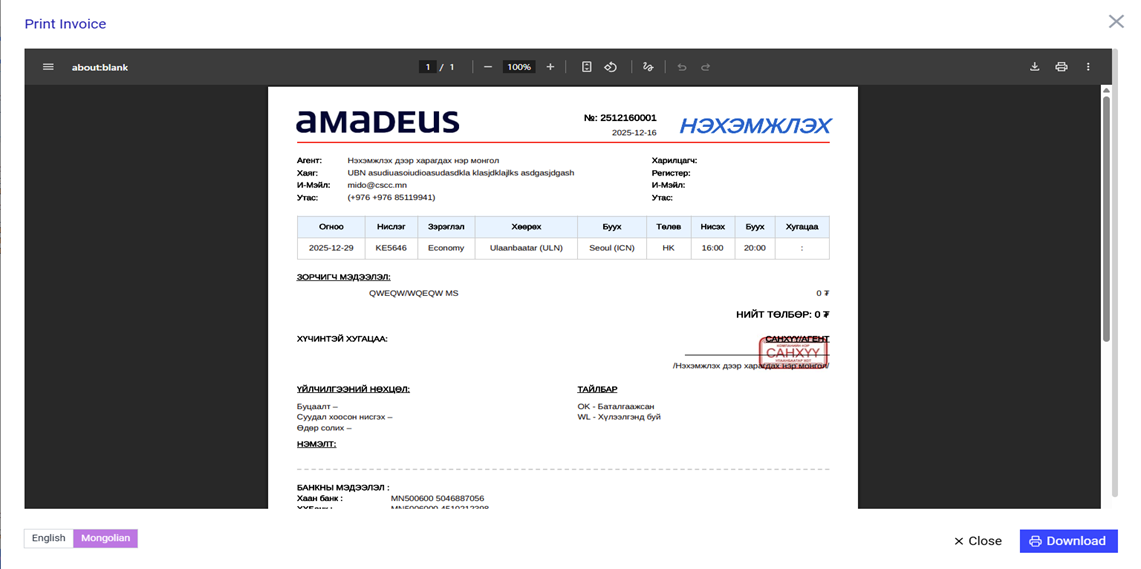
You can download and use the created invoice in the required language from the section located at the lower-left corner of the screen.
ТӨЛБӨРИЙН БАРИМТ ҮҮСГЭХ – CREATE RECEIPT
Та үндсэн захиалгын дэлгэцэн дээр дарж “Create Receipt” товчийг дарж төлбөрийн баримт үүсгэх боломжтой.
Энэ үйлдэлийг хийснээрээ та санхүүгийн ажилтанд тухайн тийзийн борлуулалтыг хийхдээ Хөнгөлөлт үзүүлсэн эсэх, Markup хийсэн эсэх, Бонус өгсөн эсэх, Тухайн тийз комисс хэд байсан зэрэг бүх мэдээллийг илгээж байгаа юм.
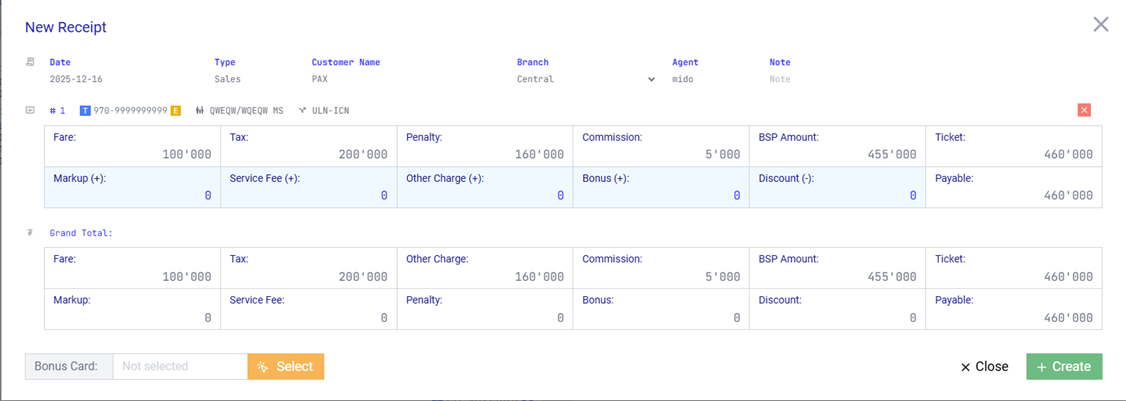
Та энэхүү гарч ирсэн цонхонд тухайн зорчигчоос нэхэмжлэх мэдээллүүдийг оруулж өгч нэхэмжлэх үүсгэнэ.
Fields:
- Markup – Additional charge
- Service fee – Service fee
- Other charge – Бусад зорчигчоос гаргуулах зардал Ж/нь : ATC төлбөр гэх мэт
- Bonus – Тухайн зорчигчид бонус өгсөн бол энд оруулж өгөх.
- Discount – Тухайн зорчигчид хөнгөлөлт үзүүлсэн бол
Та дэлгэцийн зүүн доод булан байрлах Bonus card – Select дарж тухайн хүний бонус картыг сонгож өгч болох бөгөөд Bonus талбарт бичигдсэн дүн энэхүү сонгогдсон бонус картанд автоматаар бодогдож орох юм.
ТӨЛБӨР ХОЛБОХ – ADD STATEMENT
Та үндсэн захиалгын дэлгэцэн дээр дарж “Add statement” товчийг дарж төлбөрийн баримт үүсгэх боломжтой.
Receipt үүсгэсний дараа таны захиалгын Payments талбарын ард Улаан өнгөөр Credit – төлбөрийн үлдэгдэл харагдана.
Add statement товч дарж банкны хуулганаас тухайн зорчигчийн төлбөр төлсөн баримттай холболт хийж тухайн захиалгыг дуусгана.
In this window, you can enter the invoicing details related to the passenger and proceed with creating the invoice.
Fields:
- Markup – Additional charge
- Service fee – Service fee
- Other charge – Other charges applied to the passenger (e.g., ATC fee, etc.)
- Bonus – Enter this if a bonus is granted to the passenger
- Discount – Enter this if a discount is applied to the passenger
You can select the passenger’s bonus card by clicking Bonus card – Select located at the lower-left corner of the screen.
SALES БУЮУ БОРЛУУЛАЛТЫН МЭДЭЭЛЭЛ
Та Sales цэсийг сонгон дараах мэдээллийг авах боломжтой.
- Нийт борлуулалт
- Ашиг
- Комисс
- Зорчигч бүрийн дэлгэрэнгүй мэдээлэл
“View Data” товчоор огноог сольж хүссэн огноогоор мэдээлэл гаргана.
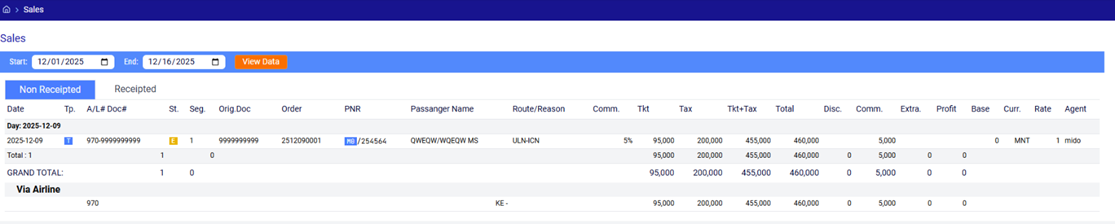
Энэхүү хуудас 2 хэсгээс бүрдэх бөгөөд
- Non Receipted : Захиалга бүртгэгдсэн Receipt буюу төлбөр мэдээлэл бүртгэгдээгүй захиалгууд
- Receipted : Захиалга бүрэн хийгдэн төлбөрийн мэдээлэл үүсгэгдсэн
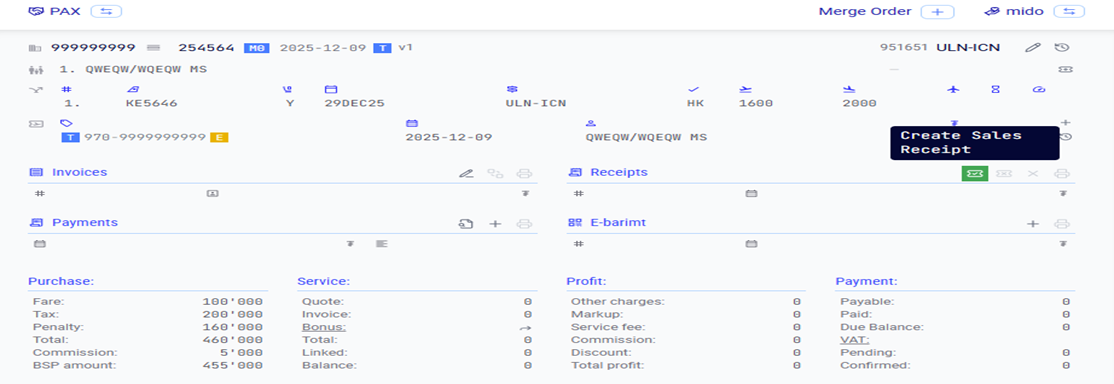
Хэрэв та Receipt буюу төлбөрийн мэдээлэл оруулаагүй бол Orders – тухайн захиалга Дээр даж Create Sales Receipt товчийг дарж Receipt үүсгэх боломжтой юм.
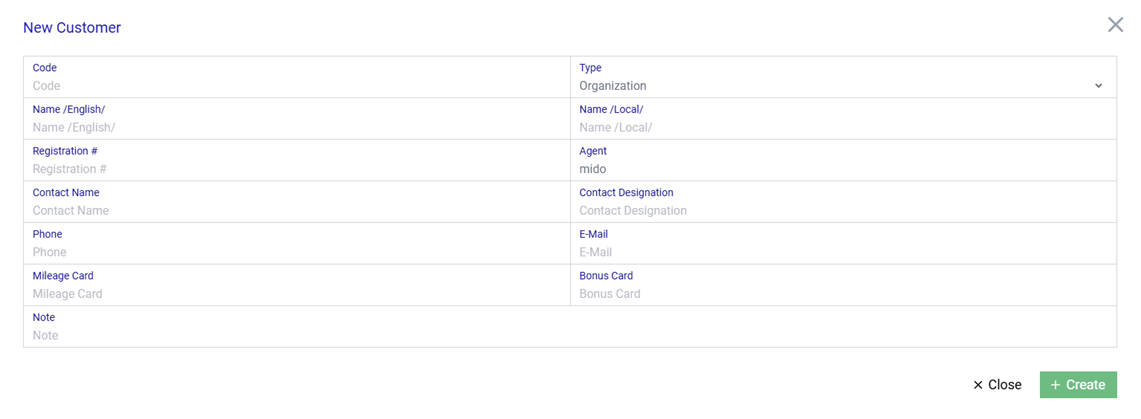
CLIENT – ХАРИЛЦАГЧИЙН МЭДЭЭЛЭЛ
Та Client цэсийг сонгон дараах мэдээллийг авах болон үүсгэх боломжтой.
- Customer – Харилцагчийн мэдээлэл
- Passenger – 1 удаагийн худалдан авагч
- Bonus card – Бонус картын мэдээлэл
Та дээрх 3 хуудсанд
- Read – Унших
- Create – Үүсгэх
- Update – Шинэчлэх
- Delete – Устгах

CLIENT – CUSTOMER
CLIENT – PASSENGER
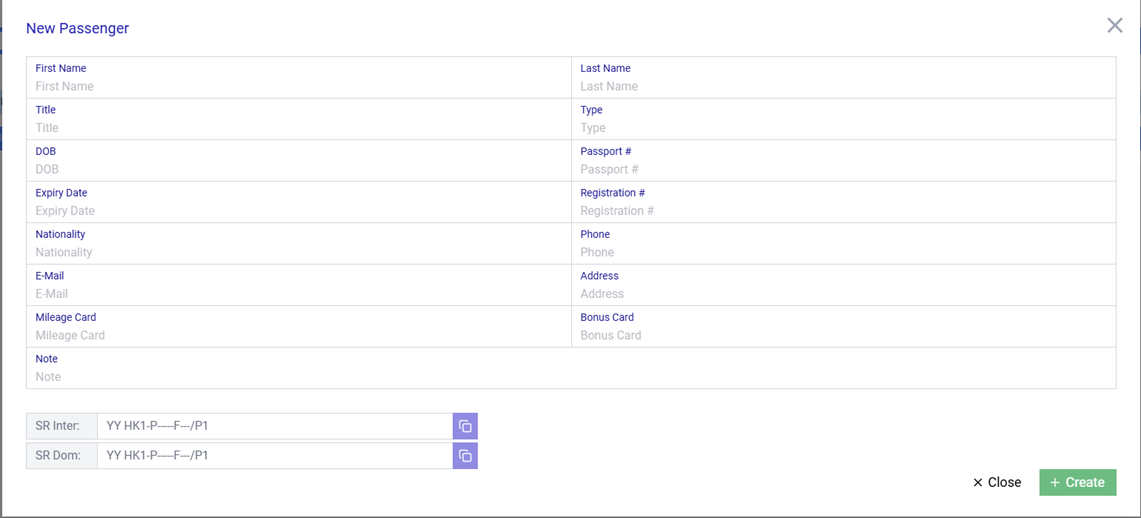
Та энэхүү хэсэгт Харилцагчийн мэдээллүүдийг бүрэн оруулж хадгалсанаар Дэлгэцийн зүүн доод буланд Amadeus selling platform систем дээр шууд хуулж аваад ашиглах боломжтой SR комманд автоматаар үүснэ.
These SR commands include:
- SR Inter : Олон улсын захиалга хийхдээ шууд ашиглах.
- SR Dom : Орон нутгын захиалга хийхдээ шууд ашиглах
CLIENT – BONUS CARD

Та энэхүү хэсэгт харилцагчийн бонус картыг үүсгэх боломжтой юм.
SmartMido нь байгууллагын үйл ажиллагааг ухаалгаар, хурдан, үр ашигтай удирдахад зориулагдсан нэгдсэн платформ юм. Систем нь өгөгдөлд суурилсан шийдвэр гаргалтыг дэмжиж, гар ажиллагааг багасган, хэрэглэгчдэд нэг цонхноос бүх чухал мэдээллийг авах боломжийг олгоно.
Энэхүү хэрэглэгчийн гарын авлага нь SmartMido системийн үндсэн боломжуудыг ойлгомжтойгоор тайлбарлаж, системийг зөв, үр ашигтай ашиглахад хэрэглэгчдийг чиглүүлэх зорилготой
Commenting is not enabled on this course.